5 Ways to Use MailChimp for Better, More Personalized Newsletters
6 years ago • Fundraising Tools • 9min read
For most people serving overseas, MailChimp is the most common method of sending newsletters to keep in contact with everybody back home. Sure, we all wish we had the time to write each donor and supporter individually every month but the fact is that this isn’t practical. The only other option is an impersonal email we send to everybody at once, right?
Not exactly. It doesn’t have to be that way.
MailChimp is a very powerful tool for communication that allows for more personalization than you may realize. Taking advantage of this powerful tool is easier than you think and has the potential to make your supporters feel like you’re talking to them personally, not just sending a mass email.
Each of the following tips provides an actionable step you can take within MailChimp to create better, more personal newsletters for your supporters.
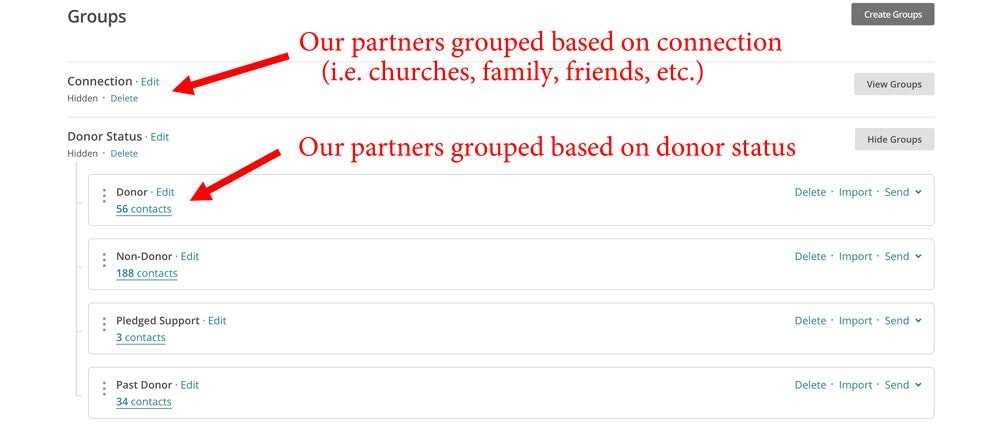
#1 Use MailChimp to Organize Your Supporters
The first thing you need to do in order to take advantage of MailChimp’s personalization features is to organize your supporters. This can be done in a number of different ways, but I personally make sure to organize my list by:
- Adding a supporters’ name to their contact details. You’ll understand why we do this in tip #2. Make sure you write the name as you would normally call them in person (i.e. Don’t use “Robert” if you normally call him “Uncle Bob”).
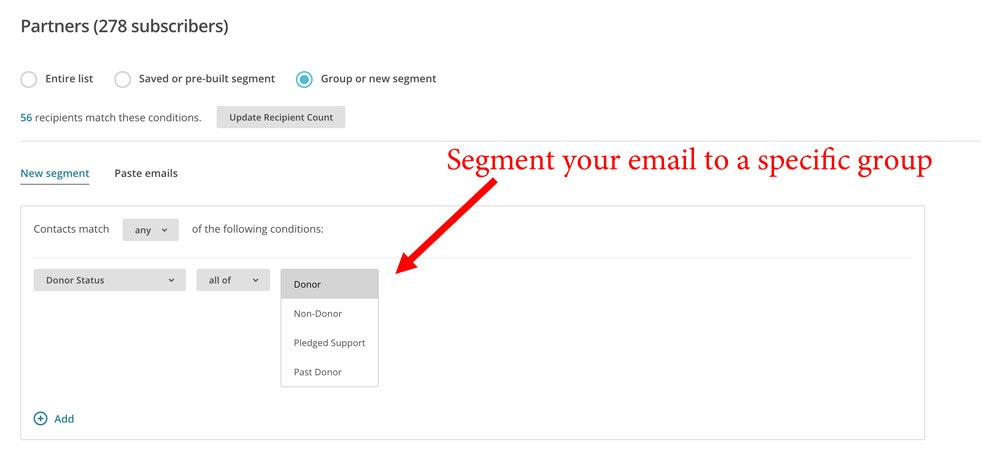
- Create a Group Based on Financial Status. For me, I segment my list in the following way: non-donors, donors, past donors. When we were in the midst of initial fundraising, I even had a category for “pledged donors”. This will be important for tips #3 and #4.
- Create Affinity Groups. This may seem like overkill, but I promise you it will pay off in the long run. I personally divide my list into church affinity groups as well as general “family”, “friends” and “Other Missionaries”. Again, we’ll use these groups in tips #3 and #4.
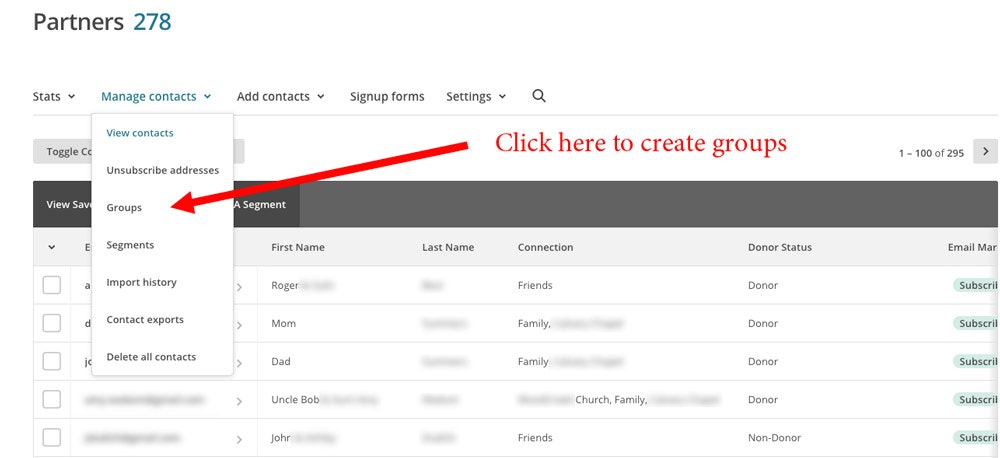
Organizing your MailChimp list may take an hour or two if you’ve never done it before, but be patient. It’s worth it.
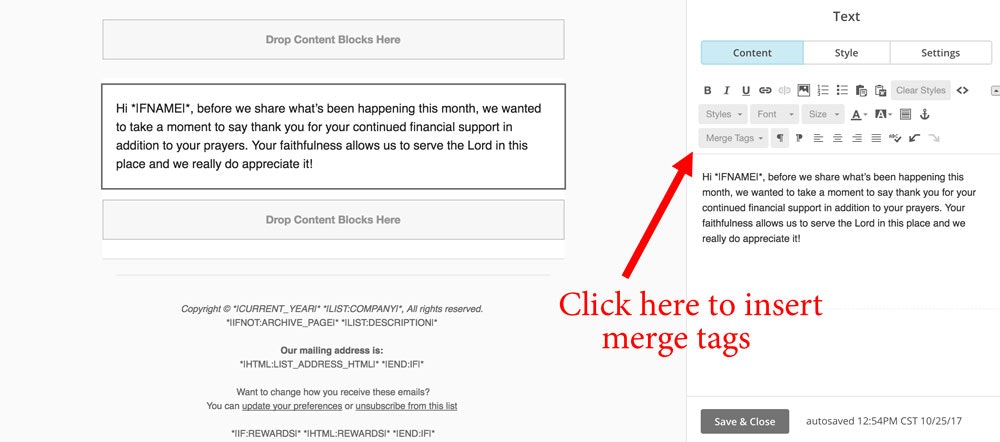
#2 Use Conditional Merge Tags in Your Emails
Now that you’ve organized your supporter list, the most practical way you can use it is by utilizing what are known as Conditional Merge Tags. Don’t worry if you’ve never heard of that before. I’ll explain.
Merge tags are an easy way of using the information you’ve already attached to a contact. For example, instead of opening your email with a very impersonal “Hey there” or “Greetings from [your country]!”, you could instead write “Hey *|FNAME|*”. MailChimp will then insert the first name you’ve added for that person to the email when it sends.
People still know it’s a mass newsletters but when you use their name, they feel more engaged. When I started using first names in our emails, the number of replies we got to our emails almost doubled.
If you really want people to engage with your email newsletters, though, you can go one step further with segmentation.
#3 Use Segmentation when Sending Newsletters
Have you ever looked at your email open rates and thought “This can’t be right, I know more people read my newsletter!” Sadly, this isn’t always the case. People are inundated with more emails these days than they can handle, so you need to take an extra step to make sure that people stay engaged with you.
Segmentation is a proven way to improve open rates. Let me give you a few examples.
About once a quarter, I make sure to send an email specifically to our financial supporters. Most of the email content is the same as the newsletter I send everybody else except it starts off with something like this:
Hi *|FNAME|*, before I share what’s been happening this month, I wanted to take a moment to say thank you for your continued financial support in addition to your prayers. Your faithfulness allows us to serve the Lord in this place and we really do appreciate it!
That’s it! It’s a much more personal email and it assures your donors that their money is still being received.
How else can segmentation be used? There are a number of creative ways, but here are a few examples to consider:
- Following a big disaster in our home state, we sent a segmented email to only the supporters from the churches where the disaster had happened, telling them that we were specifically lifting them up. The response was amazing.
- During one of our home leaves, instead of sending a mass email that said “We’ll be in this city on this date, this city on this date, etc.” we segmented our emails based on church locations. In other words, we sent an email to all the churches in Chicago where we had supporters telling them when we would be in Chicago and how to get in touch with us. We did the same for supporters in Cleveland. Our subject lines reflected segmentation (such as “We’ll be in Chicago soon and we want to see you!”) and we had a great turnout in each city.
- While we were fundraising, we got to the point where we had a number of people who had committed to give but hadn’t actually done so. Within a few minutes, we were able to send a segmented email to everybody who we had marked as “pledge donors” (see tip #1) to say that we appreciated their pledge and here are instructions on how to give.
If you segment well, you’ll notice your open rates will start climbing. And before you write that off as an unnecessary metric, consider this: the more people who open your emails, the more people who will stay engaged despite you’re prolonged absence. The more people who are engaged, the more prayer support you will have!
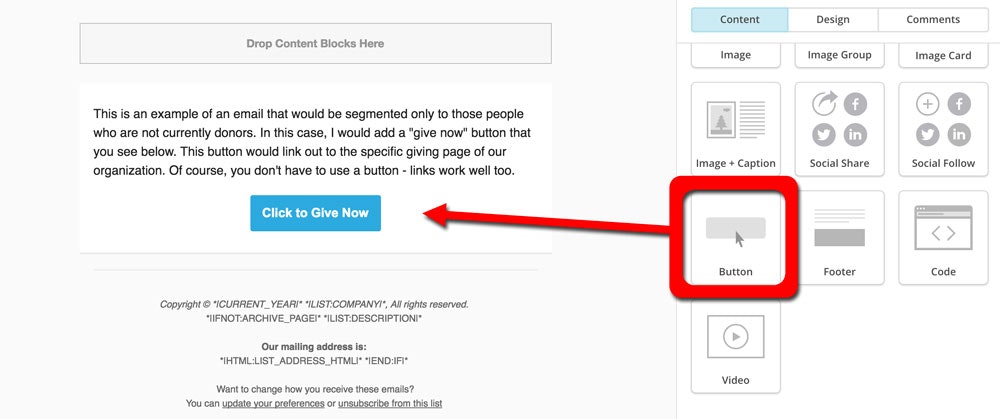
#4 Add Action Buttons/Links based on Segmentation
When you send an email to a person who financially supports you, and that email includes a “give now” button or a “Here’s how to support us financially” link, what kind of message do you think that sends?
Personally, it seems to tell me that you don’t realize that I’m giving or maybe my gift isn’t being directed to you appropriately.
Each time you send an email, take an extra 5 minutes to segment based on donor status. If they are non-donors, make sure to have a “Give Now” button or link. If they are already donors, you can either omit the button/link or just put a “Thank you for your gift” in its place. For lapsed donors (donors who gave in the past but don’t anymore), reword it to say “Thank you for your previous giving. If you’d like to support us again, you can do so here”.
 #5 Mobile-Optimized Design
Did you know that more than 60% of your supporters are opening your email on a mobile device now? It’s true, and the challenge here is with the design.
I know a lot of folks that are drawn to the email templates with multiple columns and fancy picture galleries, but these aren’t always the best choice. Whether you use a MailChimp template or better yet, get a personalized email design for your digital newsletter, there are a couple tips to keep in mind:
- Keep it simple. Single column is usually best unless the design is “responsive” (if you don’t know what that means, just stick with a single column).
- Add Picture Links. When people view your newsletters on their phone, often the photos are small and you can’t zoom in. By adding a file anchor link, they can click on the picture to see the full size.
Conclusion | Using MailChimp for Newsletter Personalization
Part of our jobs as we serve on the field is to communicate what is happening and how God is working to the people who are supporting and praying for us back at home. Perhaps segmentation seems daunting to you or you’ve never cared much about “open rates”. I completely understand.
But I want to challenge you to think differently. It’s impossible to write every person every month, but we still need to thank our supporters and let them know their gift is being used appropriately. We still need to engage them so that they stay current with how to be praying.
As you can see here, MailChimp gives you the ability to do this well. It’s up to you to use the tools.